
CAT 329D Main Pump (SBS140): Installation, Commissioning & Long-Life Care Guide


Author
JERY WANG
Guangzhou Rito Hydraulic Co.,Ltd., located in Guangzhou, China, is a leading manufacturer and distributor of hydraulic pumps, final drives, swing motors, and main control valves for earthmoving machinery. We supply genuine, OEM, and high-quality aftermarket parts.
We are committed to continuously sharing our expertise regarding construction machinery and excavator hydraulic systems. Our goal is to help you gain a deeper understanding of equipment principles and applications—enabling you to work more efficiently—while also showcasing our professional knowledge and capabilities. We invite you to learn more about us.
Choose us, and you will enjoy the best service, the most favorable prices, and the most reliable supplier!
Marie R. Winters


Quick Answer
Key Takeaways
- SBS140 is the pump model; the plate code is the exact part number. Match by code and machine serial.
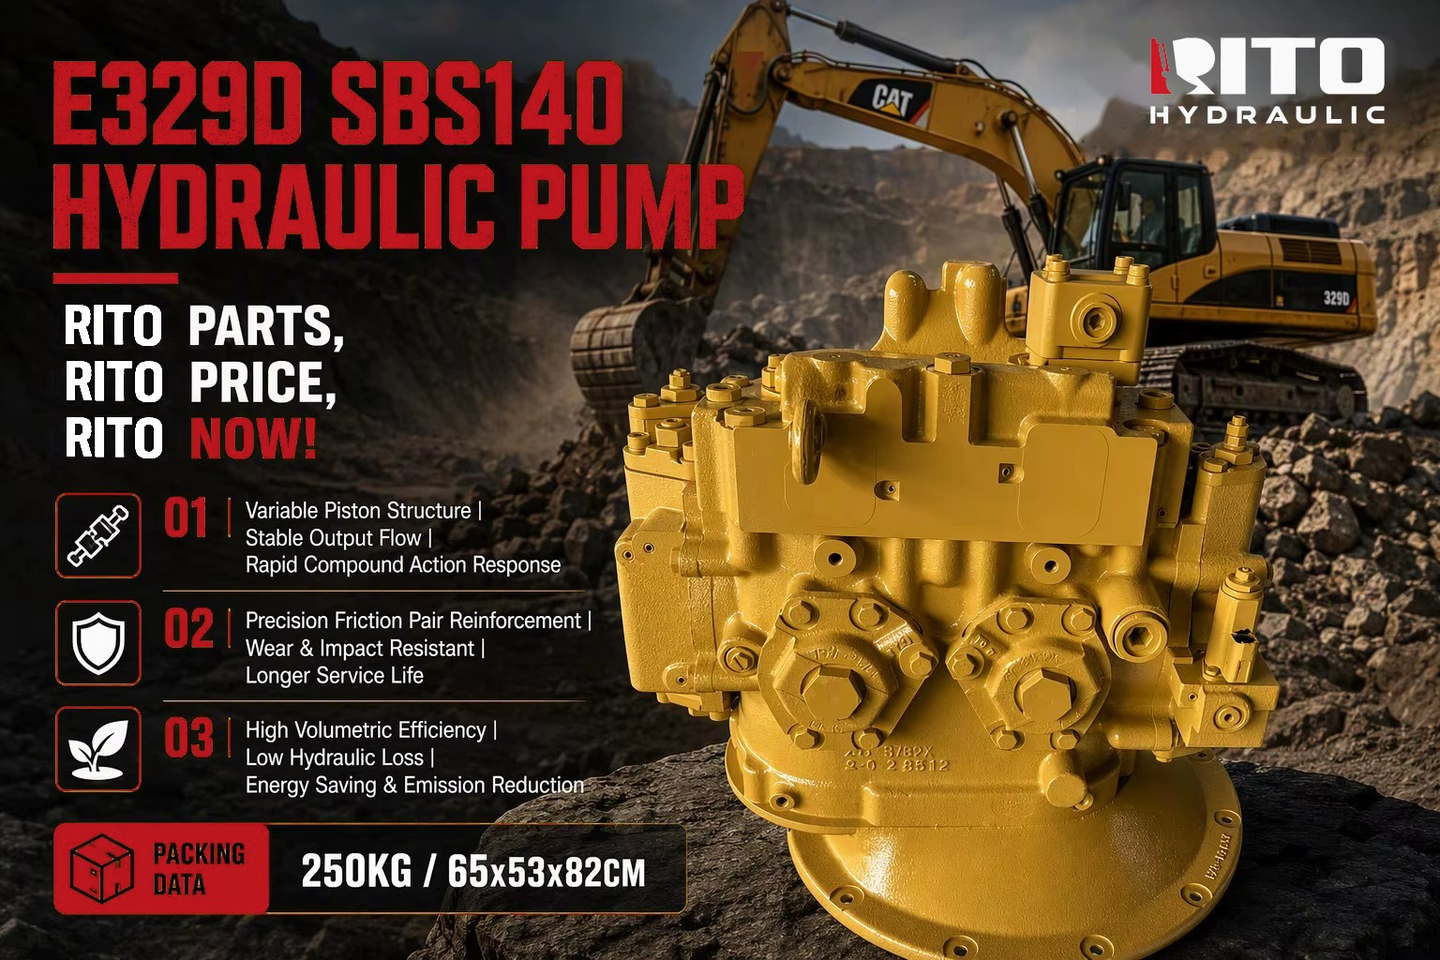
- The assembly weighs about 250 kg and ships in a 65 × 53 × 82 cm case — plan lifting at both ends.
- Flush the system and renew filters before fitting. Contamination from the old pump is the top cause of early failure.
- Cleanliness during the job matters more than speed. Cap every open line.
- Commission properly: bleed, check pressures and settings against the machine specification, and run light before full load.
- Use the manufacturer's specification for torque and pressure values — never a guess.
Table of Contents
- 1. The Product at a Glance
- 2. What "SBS140" Tells You
- 3. Before You Start: Planning a 250 kg Job
- 4. Pre-Installation: Five Things to Do First
- 5. Installation: The Sequence That Matters
- 6. Commissioning: First Start and Settings
- 7. Long-Life Care: Six Habits
- 8. Replace or Repair?
- 9. FAQ
- 10. Get the Right Pump
1. The Product at a Glance
| Item | Detail |
|---|---|
| Application | CAT 329D (30-tonne class excavator) |
| Pump model | SBS140 |
| Type | Variable-displacement piston pump assembly |
| Weight | 250 kg |
| Packing | 65 × 53 × 82 cm |
| Design highlights | Variable piston structure; stable output flow; rapid compound-action response; reinforced precision friction pairs for wear and impact resistance; high volumetric efficiency and low hydraulic loss |
Those design points are not just marketing. Each one tells you what to protect during installation: "stable output flow" is the first thing contamination erodes, and "high volumetric efficiency" is exactly what a dirty system destroys. A clean, correctly commissioned installation is what lets those characteristics actually deliver. Complete, individually tested assemblies are listed under Caterpillar-series hydraulic parts.
2. What "SBS140" Tells You
| Level | Example | Answers |
|---|---|---|
| Model | SBS140 | "What kind and size of pump is it?" |
| Part number | the full code on the pump plate | "Which exact build does my machine need?" |
Two habits follow. First, "SBS140" is a model, not an order number — the number in it denotes the pump's size class, and the machine's requirement is confirmed by the plate code. Second, a pump can carry the right model name and still be the wrong build for your machine, because machine makers revise specifications during a model's production run.
So before anything else: photograph the pump plate and read your machine serial. If you would rather diagnose before you replace, our companion guide covers why a CAT 329D loses power and how to test the pump.
3. Before You Start: Planning a 250 kg Job
The physical side of the job causes as many problems as the technical side. Plan it properly:
- 1. Lifting. 250 kg cannot be handled safely by hand. Use rated lifting equipment with a secure sling, and keep the load balanced — a swinging pump damages ports and people.
- 2. Space and light. Work where you can control the pump as it comes out and goes in. The pump bay of a 30-tonne machine is not a place to improvise.
- 3. Container and caps. Have clean drain containers, plug caps and lint-free wipes ready before you open anything. Every open port is an invitation for dirt.
- 4. The consumables. New return filter, new suction strainer element, fresh correct-grade oil — all on site before the pump comes off, not after.
- 5. Your reference. The machine's service specification for torque values, oil grade and pressure settings.
4. Pre-Installation: Five Things to Do First
| # | Do this | Why |
|---|---|---|
| 1 | Confirm the new pump against your plate code | Before it is off the crate, not after it is bolted up |
| 2 | Drain the hydraulic tank | Reduces spillage and lets you inspect the oil for metal |
| 3 | Flush the system | Removes the debris a failed pump has already circulated |
| 4 | Renew the return filter and suction strainer | A clogged or contaminated filter re-infects the new pump immediately |
| 5 | Inspect the oil you drained | Metal or a burnt smell tells you the problem may extend beyond the pump |
Step 3 is the one people skip, and it is the most expensive shortcut in the whole job. A failing pump sheds metal into the oil; if that oil stays in the system, the new pump starts its life grinding. If a replacement pump has failed early on you before, this is usually why — see why excavators still fail after a pump replacement.
5. Installation: The Sequence That Matters
Follow the sequence, and keep cleanliness as the governing rule throughout. Read torque values and settings from the machine's specification — never from memory or a guess.
| Step | Action | Key point |
|---|---|---|
| 1 | Remove the old pump and cap the lines | Cap or plug every open connection immediately |
| 2 | Clean the mounting face and coupling area | Dirt at the flange falls straight into the system |
| 3 | Check the new pump's ports and face are clean | Protective plugs come off only at the moment of fitting |
| 4 | Fit the pump, engage the coupling, seat the flange | Do not force the spline — it should engage cleanly |
| 5 | Torque fasteners in the specified sequence | Use the manufacturer's values; tighten progressively |
| 6 | Reconnect lines with new seals where specified | A weeping joint is an air leak on the suction side |
| 7 | Fill with fresh correct-grade oil | Use the grade in the machine specification |
| 8 | Prime and check for leaks before starting | Never let the pump turn dry |
Two rules worth writing on the wall: cap everything the moment it is open, and never run the pump without oil. Between them they prevent the majority of installation-related failures. Replacement assemblies are listed under excavator hydraulic parts.
6. Commissioning: First Start and Settings
Starting the machine is not the end of the job — it is the last stage of it.
- 1. Start at low idle and let the system circulate before demanding anything from it.
- 2. Bleed the system. Air in the circuit causes noise, erratic movement and damage; it must be worked out deliberately.
- 3. Check for leaks at every joint you touched — especially the suction side, where a small air leak starves the pump.
- 4. Verify pressures and settings against the machine specification, and adjust only what is meant to be adjustable.
- 5. Run each function gently through its range, watching for noise, heat or sluggishness.
- 6. Only then return to normal work. A short, gentle run-in is cheap; a full-load start on a dry or air-filled system is not.
If a function is still weak after correct commissioning, resist the urge to blame the pump immediately — one or two weak functions usually point to the control valve assembly rather than the pump that serves everything.
7. Long-Life Care: Six Habits
| Habit | What it protects |
|---|---|
| Keep the oil clean | The precision friction pairs — contamination is wear |
| Change filters on schedule | A saturated filter stops protecting and starts bypassing |
| Watch oil temperature | Hot oil thins and accelerates wear; a working cooler matters |
| Use the correct oil grade | Wrong viscosity changes clearances and efficiency |
| Protect the suction side | Prevents cavitation, which pits metal surfaces |
| Act on early symptoms | Rising heat, new noise or slower cycles are cheap signals to heed |
Notice that none of the six is about the pump itself. Pumps rarely fail from their own design — they fail from what the oil and the environment do to them. That is what makes these habits the cheapest maintenance you can buy.
8. Replace or Repair?
Installation time is also decision time. A few guidelines:
- Replace when the fault is internal wear in the rotating group or regulator, when metal has circulated, or when the pump is already at the end of its service life.
- Repair only when the fault is genuinely confined to a serviceable item and the rest of the pump tests within specification.
- In both cases, flush the system and renew filters — the decision does not change the contamination rule.
Count downtime in the comparison, not just parts. On a working machine, the cost of being down again in three months usually outweighs the difference between a proper assembly and a low-end rebuild.
9. FAQ
Q1: How long does it take to replace a CAT 329D main pump?
The work itself is a solid day for an experienced technician, but plan the surrounding steps too: confirming the pump, flushing the system, renewing filters and commissioning. Rushing those is how a new pump ends up failing early.
Q2: Do I have to flush the system when fitting a new pump?
Yes — always. A failed pump leaves debris in the oil, and that debris will damage the new pump. Flush the system and renew the return filter and suction strainer.
Q3: How heavy is the SBS140 pump, and how is it packed?
About 250 kg, packed in a 65 × 53 × 82 cm case. Use rated lifting equipment at both the crate and the machine.
Q4: Can I fit the pump and start working immediately?
No. Start at low idle, bleed the system, check for leaks, verify pressures and settings against the machine specification, and run each function gently before returning to full load.
Q5: What is the most common installation mistake?
Contamination. Skipping the flush, leaving ports open, or reusing contaminated oil is the most common reason a new pump has a short life.
Q6: Is SBS140 the part number I should order by?
SBS140 is the pump model. The exact part number is the full code on the pump identification plate, confirmed against your machine model and serial number.
Q7: What oil should I use?
Use the grade and specification stated for your machine. Oil type affects clearances, efficiency and wear, so it is not a place to substitute.
Q8: How do I know if the pump or the valve is at fault?
Weakness in all functions together points to the pump; weakness in one or two functions points to the relevant valve section. A pressure and flow test confirms it.
Q9: What should I check in the first hours after installation?
Leaks at every joint you touched, unusual noise, rising temperature and slow or erratic functions. Address anything you notice immediately rather than waiting for the next service.
Q10: What should I send to get the right pump?
Machine model, machine serial number, the full code from the pump plate, and a few clear photos of the pump including the ports.
10. Get the Right Pump
Send us your machine model, serial number and the full pump code from the identification plate — plus a few clear photos — and our team will confirm the correct SBS140 build, provide a test-report sample and quote lead time the same day. RITO HYDRAULIC supplies complete, individually tested main pumps, control valves, travel motors and swing motors for Caterpillar, Komatsu, Hitachi, Kobelco, Hyundai, Doosan and Kawasaki-series machines — with export packing and a 6–12 month warranty.
Contact our team or learn more about RITO HYDRAULIC.
Related reading: the classic faults that mimic a failed pump.
- CAT 330GC Final Drive — Which Part Number Fits and What Should You Check Before You Buy?
- Why Do Customers Need the TM40 Travel Assembly? When It Is Used, What It Does, and What It Changes
- Komatsu PC300-8 / PC350-8 Hydraulic Pump: Which 708-2G Number Fits, and Why PC300-7 Numbers Keep Appearing
- Why Does a CAT 320C / 320D Hydraulic Pump Lose Power Under Heavy Load?
- Why Does Your CAT 312C Need the SBS80 Hydraulic Pump?